
Mailster Integration
Sartre Email is integrated with the Mailster WordPress Plugin, which you can use to send email campaigns directly from your WordPress-powered site using services such as SendGrid, Mailgun, SparkPost, or Amazon SES.
Structure
The Mailster-integrated files can be found in the Files/mailster folder from your download.
This folder has the same structure as the Files/html folder, only that all files inside it are editable or ready to use with Mailster:
/all-in-one- all-in-one template .zip file/components- buttons, navigation, dividers, and spacers/grid- the grid system/layout- the boilerplate layout file/sections- all the template sections
Only the all-in-one template .zip file from the Files/mailster/all-in-one folder can be imported in Mailster. All others are just for creating a Mailster-compatible template yourself.
If you're planning on creating a Mailster template yourself, please first take a look at their documentation, and then at our own templates to understand how to do it.
Uploading to WordPress
Inside the Files/mailster/all-in-one/ folder, you'll find the .zip file.
This file is what you need to upload under Newsletter → Templates, in WordPress. It the Base and Notification all-in-one templates, which you can use to quickly create layouts just like in our demos.
Pro Tip
Our Mailster integration comes with automatic download via Envato. Once you've purchased the product, you can simply go to Mailster → Templates → More Templates, and click the Download button for the product. This feature requires that you are logged in on Envato with the account that you used to purchase our product.
Supported Tags
The following Mailster tags and variables are supported in Sartre Email:
General Functionality
- Support for the "Auto" feature (magic wand)
- Background image support - just click a background image to change it
Template Tags & Classes
<module><single><multi>textbutton(class for table-based HTML buttons)
Personalization Variables
{webversionlink}{unsublink}{notification}{copyright}{can-spam}
Mailster supports many more variables, which are too specific to each WordPress installation for us to include in our email template. Learn more about using variables in Mailster campaigns →
Customisation
Mailster offers a solid and easy-to-use email builder, accessible right from your WordPress dashboard. Text and images can be customised in a way similar to how you edit your posts and pages, and sections can be ordered with drag and drop.
For advanced users, it also offers the possibility to edit the HTML source code of each section.
Notification Templates
The Mailster notification template that comes with Sartre Email contains all modules, for maximum flexibility. It just lists the transactional layout sections first.
If you tried setting the default template for Mailster to be Sartre, and then chose to 'use Mailster for all outgoing mails' (under General/System Mails), you might have noticed that the emails being sent contain all modules.
This is because Mailster uses the entire file you select in that setting (so, notification.html). You will need to create your own notification email layout, with Mailster's email builder, and save it as a new template file:
- Create a new campaign (name doesn't matter), and choose to use Sartre with the Notification template
- Design your own layout for future transactional emails. These require at least the
{content}and{headline}variables, so you can use the "Confirm Email" section, or just add them in yourself in a different section. You can of course add a header with logo, or a footer module - anything you want - but those two variables need to exist. - When done, next to the dropdown where you can change the template being used, you have a floppy disk icon. This allows for saving the current layout that you built, as a new template file (documentation).
- Click it, and fill in the details like in the screenshot. It's important that you do not check 'include original modules', and that you save as new template file:
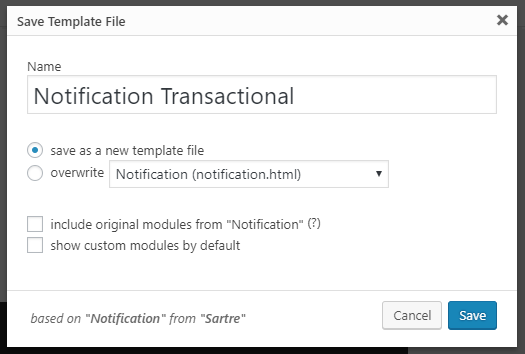
Save it, and Mailster will create a new template file, called notification-transactional.html, which you can select to use as the template for transactional emails, in the General settings for Mailster:
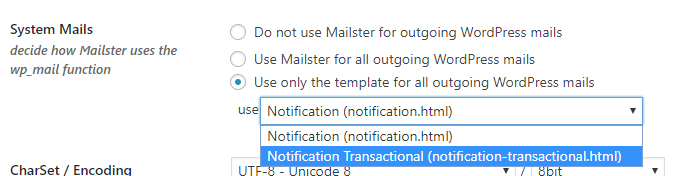
Your transactional emails should now use the new layout that you have just created.
HERO With Video
There is currently no way to visually edit the HERO With Video in Mailster, so you will need to edit it entirely through code. To bring up the code editing window, click the </> button on the right, when hovering the section:
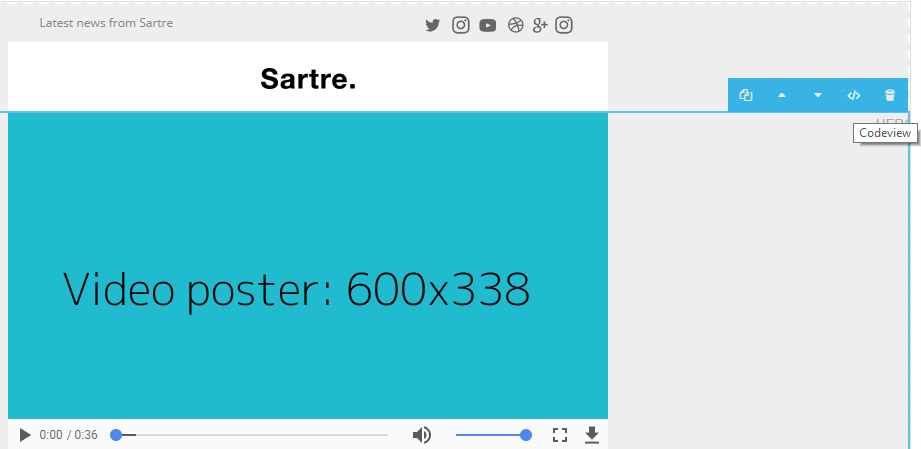
You'll need to edit both the HTML5 video settings and the fallback HTML as well. Please see the HERO With Video editing section.
When finished, hit Save to apply your changes.
Background Images
To edit the background image of a section in Mailster, simply click it and you will be presented with the image library modal, where you can choose what image to use.
Mailster will update the image path in all places required, so that background images will render as intended.
Limitations & Other Notes
Although Mailster's builder is quite flexible and works well, it still has a few drawbacks, at least for now.
Conflicting Browser Plugins
The Grammarly browser plugin severely affects online email editors, including MailChimp. By injecting itself into the page, it corrupts email HTML, resulting in a broken template.
Warning
Please disable any plugins such as Grammarly or AdBlock when using an online email builder. As a rule of thumb, we recommend disabling any plugins that manipulate content on a web page when using any of the integrations provided with our email templates.
Hamburger Menu Icon
To edit the hamburger menu icon, you need to click the </> button next to the module in the builder, to bring up the HTML code editor, as mentioned above for the HERO With Video.
In the code editor that shows up, you then simply replace the image src="" URL with the new one that you want to use. This is because the hamburger menu icon is only visible on screens smaller than 600px.
Auto content feature
Please keep in mind that this Mailster feature is still in its early stages. It currently cannot correctly fill in multi-column layouts (you can see this with the default Mailster template, too). Until further notice, use it only with single column sections.
As always, test before you send!